DPI / Week 3 (Selection Tool, Physical, and Digital Collage)
06.9.2021 (Week 3)
Abigail Kartika Darmowinoto / 0350525 / Bachelor of Design in Creative Media
Digital Photography and Imaging / Taylor's University
Week 3
LECTURES
INTRODUCTION TO PHOTOSHOP II
Mr. Martin gave us an introduction to Photoshop. After Mr. Martin gave us a brief lecture about Photoshop Tool, especially Pen Tool, Magic Wand, and Lasso Tool, he started to demonstrated it on screen.
First, he introduced us about the Toolbar in Photoshop.
fig. 1, Photoshop Toolbar, source; (https://docs.google.com/presentation/d/1ieD5ozkxw8FjuT5QeAtxT71uXQ-pfaWwk10yP2AyksY/edit#slide=id.ged7d141479_1_6),
Week 3 (06/09/2021)
Then he taught us about the four tools that will be used on the exercise, started with Marquee Tool, Lasso Tool, Pen Tool, Magic Wand, and lastly, layers.
fig. 2, The Selection Tool, source; (https://docs.google.com/presentation/d/1ieD5ozkxw8FjuT5QeAtxT71uXQ-pfaWwk10yP2AyksY/edit#slide=id.ged7d141479_1_6)
,
Week 3 (06/09/2021)
- Marquee Tool (key shortcut = M)

fig. 3, Rectangular Marquee Tool, source; (https://thenounproject.com/term/rectangular-marquee-tool/177529/),
Week 3 (06/09/2021)
- Made by creating shape
- To select and mask
- There are 4 type of selections;
- Rectangular
- Elliptical
- Single row
- Single column
- Lasso Tool (key shortcut = L)
fig. 4, The Selection Tool, source; (https://docs.google.com/presentation/d/1ieD5ozkxw8FjuT5QeAtxT71uXQ-pfaWwk10yP2AyksY/edit#slide=id.ged7d141479_1_6),
Week 3 (06/09/2021)
- Made by drawing
- To draw and pinpoint specific areas
- There are 3 type of lasso tool;
- Lasso tool = freeform
- Polygonal lasso = to create straight line lasso
- Magnetic lasso
- Pen Tool (key shortcut = P)

fig. 5, Pen Tool, source; (https://www.pngitem.com/middle/oiiwbJ_pen-tool-vector-png-clipart-png-download-pen/),
Week 3 (06/09/2021)
- Made by adding pen and anchor
- To create a path from scratch
- To create extremely precise shapes and paths
- There are 5 type of lasso tool;
- Pen tool
- Freeform pen tool
- Add anchor
- Delete anchor
- Convert point
fig. 6, How to Use Pen Tool, source; (https://docs.google.com/presentation/d/1ieD5ozkxw8FjuT5QeAtxT71uXQ-pfaWwk10yP2AyksY/edit#slide=id.gd08f0b128a_0_58),
Week 3 (06/09/2021)
fig. 7, Type of Pen Tool Line, source; (https://docs.google.com/presentation/d/1ieD5ozkxw8FjuT5QeAtxT71uXQ-pfaWwk10yP2AyksY/edit#slide=id.gd08f0b128a_0_58),
Week 3 (06/09/2021)
- Magic Wand (key shortcut = M)

fig. 8, Magic Wand Tool, source; (https://www.pikpng.com/downpngs/hxTTJT_png-file-svg-magic-wand-photoshop-icon-clipart/),
Week 3 (06/09/2021)
- Made by selecting a color
- There are 2 types of wand;
- Magic Wand Tool
- Quick Selection Tool
- Layers
fig. 9, Layer's Interface, source; (https://helpx.adobe.com/photoshop/using/layer-basics.html),
Week 3 (06/09/2021)
A. Layers panel menu
B. Filter
C. Layer Group
D. Layer
E. Expand/Collapse Layer effects
F.Layer effect
G. Layer thumbnail
- Different images stacked on top of each other
- Form one final image without affecting another layers
- Used for non-destructive editing, never destroy the original
INSTRUCTIONS
<back to top>
<iframe src="https://drive.google.com/file/d/1pHwjSk8-Bzmv7iN9-yygmDtXXoOqL4yv/preview" width="640" height="480" allow="autoplay"></iframe>
WEEK 3
On week 3, we were given a task to combine some photos using the selection tool that have been taught.
WEEK 3:
- Download all of the images here to your computer: https://drive.google.com/drive/folders/1cGcbENrjSksAaMQK9np2jb6ZaM7Y-81l?usp=sharing
- Follow this tutorial demo as reference to create your digital collage: https://youtu.be/A6ua6Fd3OWA
- Create 3 different composition digital collages from the images that you’ve downloaded.
- Create A4 canvas size (vertical) in Photoshop and start to do the compositions.
- Insert 3 photo of your digital collage compositions on the section below
- Submit (Turn In) this W3_DIGITAL_COLLAGE_1
- Summary: Do some adjustment to physical composition based on Week 3 feedback, then make 3 designs for digital collage using photos provided.
EXERCISE
After Mr. Martin gave us some lecture, he demonstrated on how to do a selection in Adobe Photoshop. We were provided with some images for us to try. So, this is my trying process;
fig. 10, black table selection, Week 3 (06/09/2021)
fig. 11, brown table placement, Week 3 (06/09/2021)
And so, here's my result. My opinion is it's so fun if the shapes are using plain background, we can just use the magic wand tool. For the wooden table it wasn't that hard because the shapes are precisely straight, so I can use the polygonal lasso tool. :>>
fig. 12, final, Week 3 (06/09/2021)
PROJECT PROGRESSION
As I got my feedback form Mr. Martin, I was given a choice whether to continue the collage 1 or 2, because collage 3 lacks of elements.
I decided to continue collage 1, because I think its has more elements than the third. I was suggested to move the butterfly lower, so I did that. After that, I did some adjusment to some elements. I add a black paper and a word "metamorphosis" to make it easier to understand. So, here is my final output;
fig. 13, physical collage (final), Week 3 (06/09/2021)
fig. 14, physical collage PDF, Week 3 (06/09/2021)
EXERCISE 1B : DIGITAL COLLAGE
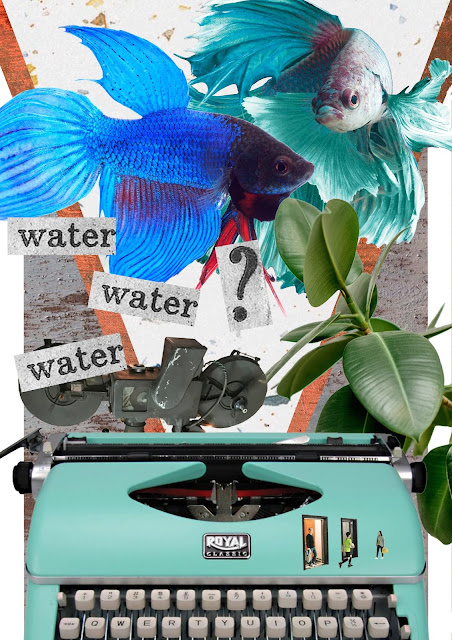
On week 3 we were provided with 15 images for us to make a composition. The composition should be A4 vertical size, and so, here're my results;

fig. 15, composition 1, Week 3 (06/09/2021)
Composition one is about a fight of fishes. Inspired from Godzilla vs Kong, I used the city as a place for them to fight.

fig. 16, composition 2, Week 3 (06/09/2021)
In composition 2, I want to tell a story of fishes' romance. The blue coloured fish is a female and the aquamarine coloured fish is a male. It's about a night date of them on a lake under the moonlight.
fig. 17, composition 3, Week 3 (06/09/2021)
The third composition is about a documentary of fishes. The typewriter and the documenter indicate the documentary. The two fishes are the main subject.
- General Feedback : A composition sometimes is better with less/more elements. It depends.
- Specific Feedback : Composition number 1 and 3 can go, number 2 still lacks. For number 1, the wing should be placed lower.
Until before Mr. Martin taught me about selection tools, the only tool I know is Magic Wand Tool. I finally had experiences using selection tool other than magic wand tool. I just know the tools that made Photoshop a very easy software for doing photo editing.


Comments
Post a Comment