Experiential Design / Task 1
03.04.2023 - 24.04.2023 (Week 1 - Week 4)
Abigail Kartika
Darmowinoto / 0350525 / Bachelor of Design in Creative Media
Experiential
Design / Taylor's University
Task 1 : Trending Experience
OTHER POST:
WEEK 2 (14/04/2023):
UNITY
Scene : where you build up everything
Game : preview
fig 2.1, Unity Build Settings, Week 2 (14/04/2023)
Choose based on your phone.
Also change the phone size based on your phone
fig 2.2, Unity Ratio, Week 2 (14/04/2023)
- If not sure choose 16:9 resolution.
- Can add with (+) button at the bottom.
Vuforia Engine
- Register account
- Choose 10.14
- Add vuforia engine to a Unity project / upgrade to the latest version
- Finish download, double-click, then update in Unity
fig 2.3, Vuforia Update on Unity, Week 2 (14/04/2023)
UNITY - GAME OBJECT
fig 2.4, Game Object, Week 2 (14/04/2023)
- Game - game object - vuforia engine - ar camera (to add AR Camera)
fig 2.5, game Object Windows, Week 2 (14/04/2023)
*where your assets are compiled
- AR Camera - Open Vuforia Configuration - Add License Key - Paste Vuforia License Key - Play - Your camera will turned on
VUFORIA - ADDING ASSETS
- Vuforia - Target Manager - Add Database - Name - Click the New Name - Add Target - Choose Type
- Image : Add Target - Choose Image - Upload picture - Choose size - Name - Add - Check The Rating (4-5 stars are preferred.)
After that, download database - Choose Unity - Double Click (*make sure you turned off camera)
fig 2.6, Importing Vuforia image to UNITY, Week 2 (14/04/2023)
How to check?
fig 2.7, Checking the Assets, Week 2 (14/04/2023)
Image Target - Image Target Behavior - Database - Choose - Image Target (if more than 1)
UNITY - ANIMATING CUBE
First make the animation panel.
fig 2.8, Animation Panel, Week 2 (14/04/2023)
Create new animation layer
Window - animation - animator = to change the default animation
fig 2.10, Animator Panel, Week 2 (14/04/2023)
Then, create new canvas for the UI Button.
Canvas - right click - UI (button tmp) - import
Make the button - change the name
How to make it functioning?
Click the button, go to the right panel. Choose this window.
fig 2.11, Add New Button, Week 2 (14/04/2023)
fig 2.12, Play Button, Week 2 (14/04/2023)
Note:
Always change canvas size into scale with screen size (right panel)
fig 2.12, Canvas Scaler, Week 2 (14/04/2023)
WEEK 4 (28/04/2023):
EXPORTING TO DEVICE
File - Build Setting - Choose Platform
Android :
(on UNITY)
*You can change everything in the project setting
*Company Name - Version - Player - Icon -> to change icon
*Minimum API Level : 30 (depends on android)
*Disable auto graphic
*Configuration - IL2CPP
*Change to the next resolution
(on Android Phone)
*Setting - Turn on developer options - enable stay awake & Allow USB Debugging
*After turn on
(on UNITY)
*Exit developer then go to Android and choose refresh then in the run device you can see your android
*Build & Run
*Create New Folder
IOS :
Download Xcode
(on UNITY)
File - BuildSetting IOS - Switch Platform
Player Setting:
*You can change everything in the project setting
*Company Name (your name) - Version - Player - Icon -> to change icon
*Resolution rotation
*Other Setting uncheck Meta API
*IOS Provisioning Profile
*Target SDK (Device SDK) & minimum IOS (14)
*Camera usage description : AR Camera
*After Build & Run will open in Xcode
IOS to IOS
(on Xcode)
*
Windows to IOS
*Install IOS Virtual Server
ADDING SCENE TO GO TO SCENE
1) File - New Scene - Add Canvas - Panel - Button
2) Build Setting - Add open scene:
*hierarchy effects on the scene arrangement
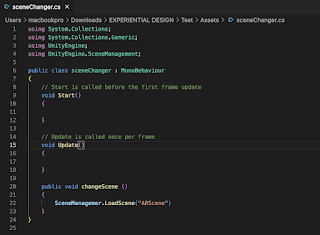
3) Make Script - attach on Canvas, code:
4) Button - Add on Click:
INSTRUCTIONS
<back to top>
Week1 (07/04/2023) :
Start doing some research on the types
of mobile AR experiences available out there.
EXERCISES
WEEK 2 (14/04/2023): EXERCISE - SIMPLE AR BUTTON & ANIMATION
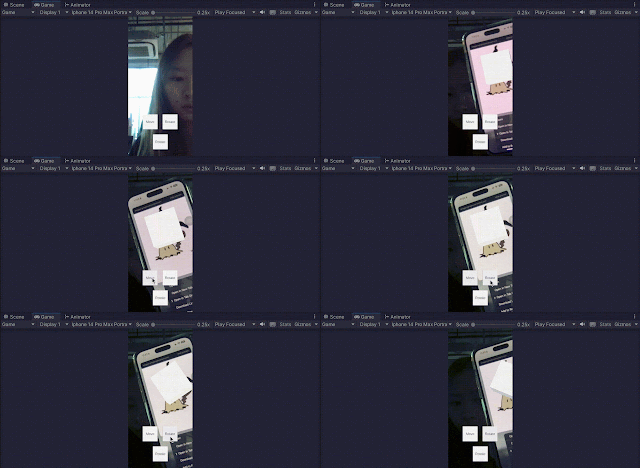
On the first lecture about UNITY, we were tasked on creating simple buttons that can make some commands according to the name. We were tasked on making a cube to make it jump and turn around.
First, we started to create a 3D files, then creating the image target and the cube. Insert the picture, so the picture I chose is my favorite Pokemon, Mimikyu :>
I add AR Camera from the Vuforia plugin, so I can try the AR. Then, I import it on Vuforia Engine, and it was 5 stars hehe, so I proceed on using it. Then I proceed on making the cube animation on each buttons. First I made it jumping, then rotating.
So this is how it looked like with both buttons:
WEEK 4 (28/04/2023): EXERCISE - ADDING SCENE TO GO TO SCENE
First, I create new scene on the previous project, then I add canvas, panel, and buttons. I changed the panel color, and change the button as START.
After that, I add the script
I arrange the format:
WEEK 5 (05/05/2023): EXERCISE - GROUP JOURNEY MAP
We were tasked on doing a group exercise to make a group journey map. So we decided to do a User Journey Map of Sunway Pyramid's TGV Cinema
AR is an unfamiliar topic for me. The only AR I ever used is Pokemon GO :D I wish I'm able to catch up and learn a lot in this module.


Comments
Post a Comment